Welcome to the instructional video for installing the MLS inventory on your website.
Installing and activating the MLSVallarta Wordpress plugin is easy - just follow these simple steps. If you know how to access the back end of Wordpress to make changes to your website, you can do this by yourself. If not, have your web developer do it for you.
First you’ll need to go to MLSVallarta.com to download the plugin. Log into the members area by clicking on “Member’s Access” found at the top of the home page. Use your username and password to sign in. If you’ve forgot this information, please contact our office and we’ll assist you. Once inside, you’ll see on the left navigation column the title “Downloads.” Click on it. Here, under “Plug-ins” on the right, you’ll find a link that will allow you to download the plugin in a .zip file format to your computer desktop. Download it by clicking on it but don’t forget the location where you saved it as you’ll be needing it later.
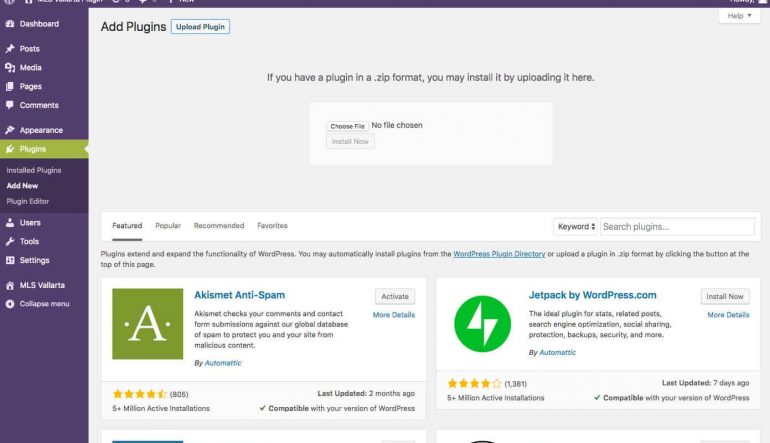
Now, open up Wordpress and access your website’s administrative backend. You may want to just open another tab in your browser as you will be returning to MLSVallarta.com later on. On the menu navigation on the left, look for "Plugins" and click on it. Your screen may not look exactly like this one does, but Plugins should be listed there.
- Once inside the Plugins, click on "Add New”
- Locate the "Upload" option and click on it. A prompt will appear on the screen asking you to locate the .zip file you downloaded earlier. Find it and select it. By default, this file’s name is "MLS-Vallarta-Wordpress.zip". Then click on "Install Now”
- Once the installation process is finished finished, click on the "Activate Plugin" option.
- The next step is to connect your MLSVallarta account with your website. To do this, go back to the MLSVallarta member's area. Once in the member's area, go to your profile and look for the green button that reads "View API Keys”. Click on this button and a small window will appear with two long strings of numbers and letters - these are your keys. Copy the “Access Key” and then go back to your website's Wordpress administrator and click on the "MLSVallarta" menu option which should now appear on the left side of your screen.
- Paste your first key into the "Access Key” field, and repeat the process with your "Secret Key”. Then click on the “Add” button.
You may see another screen with an option to add your Google Maps API key. This is not necessary to complete the configuration, but it is strongly recommended that you do this step. If you don’t know how to do this, you’ll find information about it on our website under support, found on the footer of any page. Finish by selecting your office on the drop-down menu.
On the next menu you’ll be asked to select the color you want the plug-in to show in. Select a color that is closest to the main color of your website and click on save.
And that’s it. The plugin will create a page for you in your website. If you want to have it elsewhere, you can create a widget for this. If you feel confident in doing this yourself, you can add it to the sidebar of your site, or you can ask your developer to prepare a custom widget area so the MLSVallarta search appears where you want it to appear.
- That should do it! Now your visitors can use the MLSVallarta’s search feature and view all the MLSVallarta properties directly on your site. Any inquiries they make will go to your email address.
